Welcome to hap Solutions new timekeeping app, you will be told before you start on your structure if you will using this application.
We have launched this new app to allow us to supply live structure numbers to our operations team and also our clients.
We have brought in the ability to find staff members via a QR code, to speed up finding and carrying out process a staff members timesheets.
First let walk you thought areas of the app, below that we will go though carrying out the key functions.
Guide around the app
Connecting your device
Before you have arrived at your structure, the devices should have been set up to connect to the supplied internet WIFI, supply. When you first arrive at your structure please go into the device setting and find the supplied wifi connection. If there is no connection found contact your hap Operations team.
Menus
Header menu
At the top of the app view you will find the header bar, depending on what page you are on it can differ slightly.
Side Menu
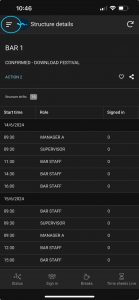
On the top left of the header bar is the burger menu, pressing this icon will open up the side menu.
Here you will find a menu of different pages.
Page name
This is the name of page/view that your on.
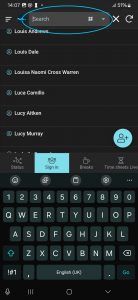
Search
When a page / view has a list of different staff members you can use this feature to find your staff member. It will search for staff members name or wristband number.
After clicking on the search bar the keypad will open up and allow you to enter in the search details.
When onsite and are utilising the QR code feature, by clicking on the small QR icon this will open up the camera and by framing the QR code the use has will find the user in the list.
Sync
The application is meant to work with a connection to the internet, while you are signing in / breaks / signing out, you will see this gain a small red dot with a number in it. This number represent the number of changes you have done. When connected to the internet you will find this will decrease as the actions and sync into the cloud. Below for more informations on syncing.
Primary menu
At the bottom of the app there is the primary menu, this will where all the main pages that you will use are located.
Status Page
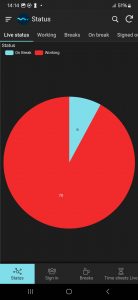
On bottom left you will find the status page, opening this page you will see below the header menu a sliding menu with different filtered views.
Live status: This is a easy view to see how many staff you have “Working”, “On break” and “Signed out”
Working: A list of all staff that are working at that present time
Breaks: A list of all working staff and broken up in easy filtered view based off start time and number of breaks. (We discuss this below).
On Break: A list of staff that are on break.
Signed Out: A list of staff that have been signed out.
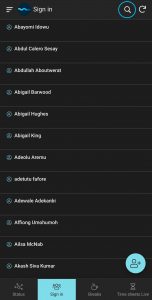
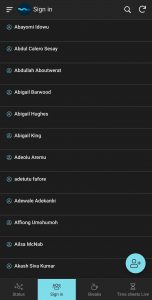
Sign in
This is a list of all staff booked on the event. Using the search in the header bar will search for the name in the list and reduce the names as you type.
Breaks
This page is an easy way for you to structure your breaks based on shift start and number of breaks. We discuss this in more details below.

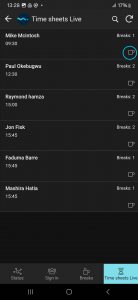
Time sheets Live
This page is todays time sheet records.

Side menu
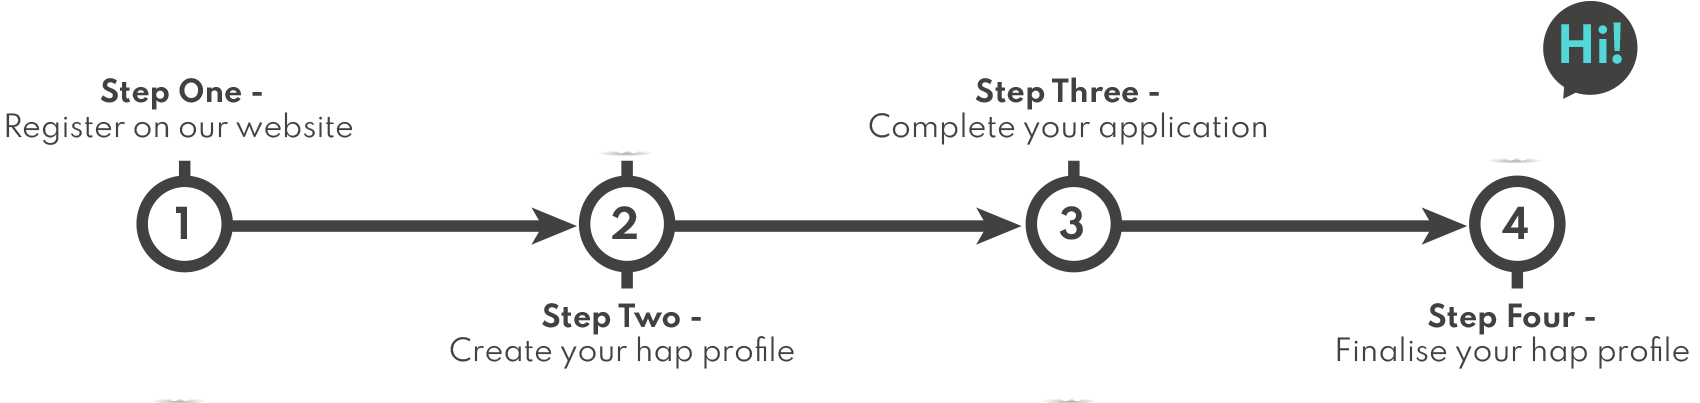
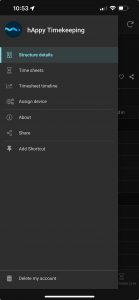
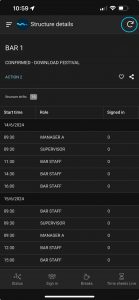
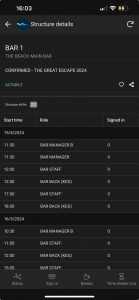
Structure details
This page shows you a break down of all the shifts that you have for this event, you will see a number of “Signed in” and the number of staff that “Worked” on your structure that shift.
Time sheets
This is list of all timekeeping records for this event and structure
Assign device
This only to be used by hap Operations teams
About
In here you will find information about the app and also by clicking on “MORE INFORMATION” you will get a link to this page.
Using the app
The app has 1 main function to record the times that staff work at our events.
We want to record the time the staff member starts and ends there shift, we also want to record when the staff member has their breaks.
In the below sections we cover all the pre-mentioned. It is important to make sure that our staff members are paid the correct amount for their time at an event with us.
Therefore the functions we discuss here are very important.
The app has been designed to make this as straight forward as possible.
Signing in staff
When staff arrive onto your bar / structure it is important that we sign them as soon as possible, please try not to brief them, let them store there belongings before they are signed in.
Search for staff
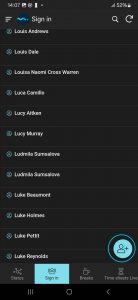
Using the page on the Primary menu called “Sign in” this where we find / create a staff member to be working on your structure.
The names are sorted in alphabetical order by their first names. This list is all the staff that are booked into the assignment.
Given that we can have very large numbers of staff booked onto an assignment, you will want to use the search bar in the header menu to find the staff member.
As you start typing their first name the list will start to filter on the search query and reduce the number of staff in the list to the closest name you have entered.
If your staff members have access to there phone you can also us the QR on their hap profile page.
To use the QR reader simply click the small QR code in the search box. This will open up the camera and then frame the QR in the device. Once the device recognises the QR code it will return to the staff list with the staff members name at the top.
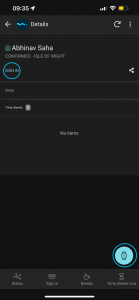
Once you have found the staff member click on the name, this will open up the staff members profile page. You are now ready to sign them in, there is 2 ways to do this. Below there name is the text “SIGN IN” or use the watch icon in the bottom right.
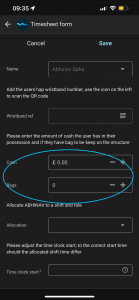
Once you have clicked the text or icon, this will open up a form with the users names and additional information that you will now enter.
If the user has a site wristband with a number on it please add this to the wristband ref box. This is not a required field but can assist in finding a staff member if a name is not known once they are signed into bar.
Next enter in the amount of cash that the user has in their possessions at the time of signing in. You will also enter in the number of bags that the staff member is storing in the bar area during the shift.
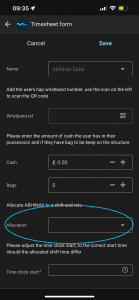
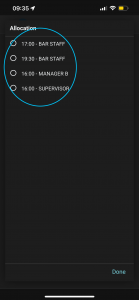
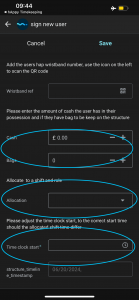
Next we will move on the allocation box. Click on the drop down menu and select the role and time that staff member is being allocated to.
* Please note this is subject to change and may not have been updated, please still allocate them to correct role and closest shift time. If your not sure please confirm with your onsite operation team what shift to use.
* As a manger or supervisor you will also see your shifts there, please make sure you sign your self in ASAP.
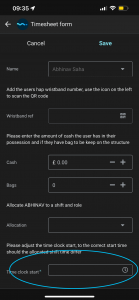
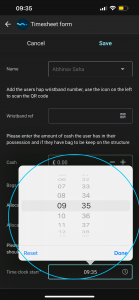
Once you have allocated a shift you will see the Timesheet start box default to the allocated shift time. If you staff member is on time or have been held up before signing in, you can leave this box with the defaulted shift start time.
Once the shift start time has passed and the staff member is late to start their shift, you will need to adjust this to the time that the staff will be paid from. If your staff have been dropped off by an operation team member please confirm the start time for them with the Operations team.
Once you have entered in the all the data, press save in the top right.
This will return you to the “signin list” and you ready to sign in the next staff member.
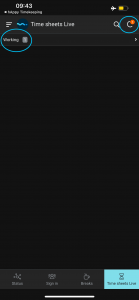
Once you have signed in a staff member you will see on your Timesheet Live page on the primary menu that you have a status of working and a number which represents the number of staff you have in that status.
As you go thought the course of the day and start breaks and signing out staff members you will see there represented here as well.
Create new staff member
At some of events you will have staff members on your bar that you could not find on the “Sign in” page, this is not a problem. If you have tried the name search and nothing is showing, we want to create a new staff member.
*The names listed here are the names that on the hap data base so if struggling to find someone please ask them how it is spelt on their hap profile. You can also ask them to get there hap profile loaded onto there phone and try the QR code search!
If you still cant find them, let create them as a new staff member to the event.
Click on the icon in the bottom right (person with a + sign). Clicking this will open up the “sign in” form but we have to enter in the staff members details.
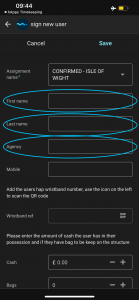
We need to add in the staff members: First name , Last name and if your aware of another agency working at this event please add there agency name in here.
Once you have done that follow the same process with allocation and timesheet start as above.
Breaks
Sending staff on breaks is an important part of your shift, in order to make the breaks fair and easy for you to process, we have created a page on the primary menu call “Breaks”!
When signing out and back in from breaks make sure the staff members departs the structure for there break straight away and when returning from their break, sign back with you straight away to make sure they are paid correctly.
Allocating breaks
When working on a large structure with large numbers of staff, it can be complicated to allocated breaks fairly. We have therefore broken down the list of working staff list into their start time and number of breaks.
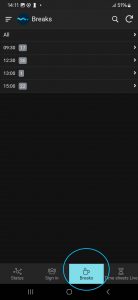
When you click on the breaks page you will see a list of start times of your working staff.
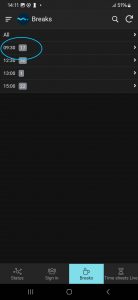
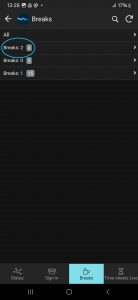
By clicking on a start time you will now see a list with the number of breaks that have been had with in each start time for those members of staff.
Sign out for break
Now that you have clicked thought the start times and number of breaks you will now see a list of your staff members meeting that criteria.
You will see the name of the staff member, total duration of all the breaks they have had and then a icon of a coffee cup with steam coming out the top.
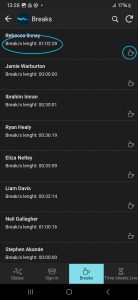
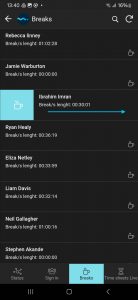
To send you staff member on a break, you can click the coffee cup icon, or swipe right on the name.
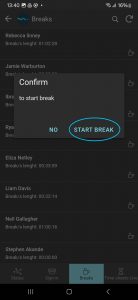
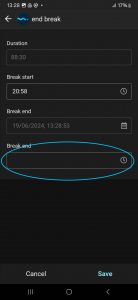
Confirm that you wish to start the break, this will open up a start break form.
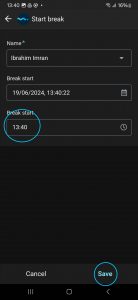
The form will pre-populate with the staff members name, a time stamp of date and time and a break start time.
If the break start is incorrect then you can edit that time manually (please note you cant edit the date/time stamp. When happy with time click save and the user is now on there break.
Sign in from break
When signing out the staff member, make sure they are clear on returning to you and signing back in from the break as soon as return to work.
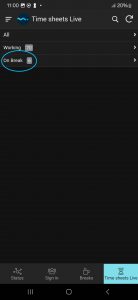
When a staff member returns from a break, you should navigate to the “Timesheet Live” page on the primary menu. Click on “On break”.
Here you will see a list of the staff on a break, simply click on the “Coffee Cup (with no steam)” icon t0 sign the user back in from their break.
This will open up a form for you to enter in their Break end time
Click save and they can now start working again.
Signing out
When a staff member is ready to be signed out, for a number of reasons we need to action this as soon as requested.
Signing out
To sign out a staff member, navigate to the “Timesheet Live” page.

Click on the “Working” row, you will now see a list of all your working staff. Search for your staff member and click on their name.
This will open up the users profile, it will list the details of the user and their shift.
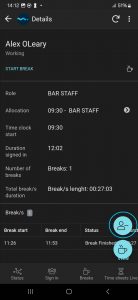
To sign the staff member out, click on the user icon with the minus icon.
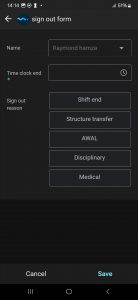
This will open up the sign out form, pre-filled with there name.
You need to enter in the “Time sheet end” time, this is the time that they stopped working.
Now add the reason for signing out.
Click save.
At the end of the your shift, you need to make sure everyone is signed out and no one is still in break.
Syncing your device
As your carry out actions (sign in / out, breaks etc) on the device you will see the sync icon have a small red dot with a number. If your connected to the internet this number will decrease as the app sends the changes into the cloud.
If the connection has dropped, this number will not go down. If you notice this dont worry, go into the device wifi setting and connect back to internet.
If your having trouble connecting, contact your hap Operation team to get you connected again. You can still carry on using while awaiting to get connected.
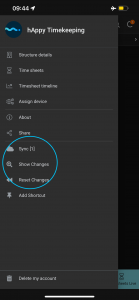
The most important thing to NOT do is reset the changes while your waiting to get connected to internet. While its waiting to get connected, on the side menu you will see below the share icon additional icons and options.
What you must never click is “Reset changes” this will delete all the timesheet records that you have done since it was last connected.
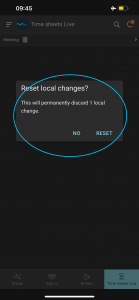
It is very clear that you will be discarding all the data you have created since the last sync so never RESET!!!!
Trouble Shooting
Resigning in staff
If a staff member has been signed out and then returns back to your structure, you will have to use the sign in page again. You will not be able to sign them back in from the “Time sheet Live” page.
QR code not finding anyone
That just means the staff list has updated, just create a new staff member as discussed above.
No structure showing
Contact your operations team, they will allocate the correct structure to your device.
Allocation no correct or shift not showing
This can happen when last minute changes are made. Just allocate to the closest shift time and adjust the “Time sheet start” to the correct time. If the role is not present contact the ops team and they will take a record of the role adjustment.
Incorrect start or end time on shift or breaks
Contact the ops team to take a note of incorrect times
Staff member not signed back in after a break.
If the staff member is still on a break when you come to sign them out, simply sign them back from a break and adjust the break end time to the correct time. You can now sign them out.
———-
Last Updated – 21/06/2024